Homemade Ultra-Creamy Ice Cream: No Machine Needed!
Dreaming of decadent, smooth, homemade ice cream but don't own a bulky, single-purpose ice cream maker? You're in luck! Crafting exquisite, ultra-creamy ice cream without a machine is not only possible but surprisingly simple. Forget the churning; we're diving into an exciting world of no-churn methods that promise restaurant-quality frozen treats right from your kitchen. Whether you're a seasoned baker or a curious beginner, these techniques will empower you to satisfy your sweetest cravings with minimal effort and maximum flavor.
For years, many believed that truly great homemade ice cream was impossible without a dedicated ice cream maker. But thanks to ingenious culinary hacks and a touch of food science, we now know better. This comprehensive guide will walk you through several easy-to-follow methods, including the incredibly popular two-ingredient wonder, ensuring you can whip up a batch of glorious frozen goodness anytime the mood strikes. Prepare to impress your family and friends with an array of flavors, all crafted without an expensive gadget!
The Magic Behind No-Churn Ice Cream: Why It Works
The secret to smooth, scoopable ice cream lies in minimizing ice crystal formation. Traditional ice cream makers achieve this by continuously churning the mixture as it freezes, breaking up any crystals before they grow large enough to create a grainy texture. Without a machine, we employ different strategies to achieve the same creamy result:
- Aeration: Whipping heavy cream incorporates air, creating a light, fluffy base that's less prone to forming large ice crystals. This air also contributes to the desired creamy mouthfeel.
- Sugar Content: Sweetened condensed milk, a staple in many no-churn recipes, contains a high concentration of sugar. Sugar acts as an anti-freeze, lowering the freezing point of the mixture and further inhibiting ice crystal growth.
- Manual Agitation: Some methods involve periodic stirring or vigorous shaking, mimicking the churning process to break down developing ice crystals.
- Extreme Cold Environment: Techniques involving salt and ice create an extra-cold environment that freezes the mixture rapidly, preventing large crystals from forming.
Understanding these principles will not only make you a better no-churn ice cream maker but also help you troubleshoot and experiment with your own flavor creations!
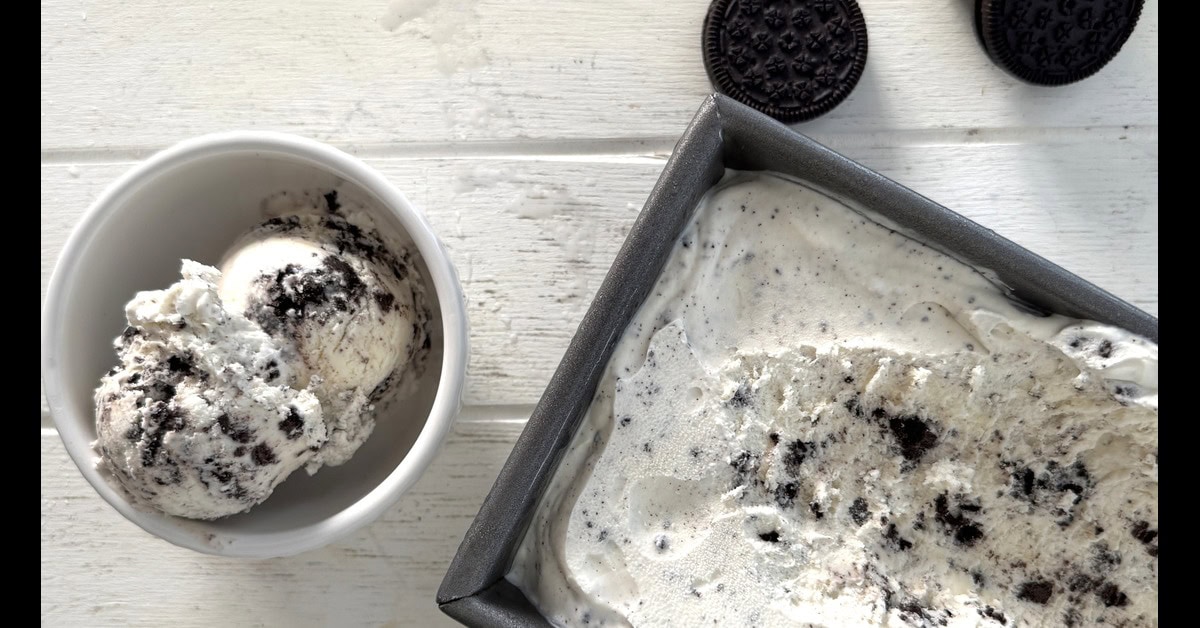
Method 1: The Ultimate Two-Ingredient No-Churn Wonder (The Easiest & Best!)
If you're looking for the simplest, most reliable way to make easy 3-ingredient no-churn ice cream (the third ingredient being your flavor!), this method is your new best friend. It's often hailed as the "best" no-churn technique for its incredible ease and consistently creamy results. You might even find yourself preferring this texture over machine-made versions!
What You'll Need:
- 2 cups (about 480ml) very cold heavy cream (at least 36% milk fat)
- 1 (14-ounce/396g) can chilled sweetened condensed milk
- Your desired flavorings or mix-ins (vanilla extract, cocoa powder, fruit purees, chopped cookies, etc.)
Step-by-Step Instructions:
- Whip the Cream: In a large, chilled bowl, pour in the heavy cream. Using an electric mixer (handheld or stand mixer with a whisk attachment) on medium-high speed, whip the cream until stiff peaks form. This means when you lift the beaters, the cream holds its shape firmly. Be careful not to overmix, or it might turn grainy.
- Fold in Sweetened Condensed Milk: Gently pour the chilled sweetened condensed milk into the whipped cream. Using a spatula, carefully fold the condensed milk into the whipped cream until just combined. The key here is to maintain as much of the air in the whipped cream as possible, so fold lightly and avoid deflating the mixture.
- Add Your Flavor: Now for the fun part! Gently fold in your chosen flavorings or mix-ins. For classic vanilla, add 1-2 teaspoons of vanilla extract. For chocolate, add sifted cocoa powder. The possibilities are endless!
- Freeze: Transfer the mixture to an airtight, freezer-safe container. A loaf pan covered tightly with plastic wrap or a dedicated ice cream container works perfectly. For best results, press a piece of parchment paper or plastic wrap directly onto the surface of the ice cream before sealing the container to prevent ice crystals from forming on top.
- Chill Out: Freeze for at least 6 hours, or preferably overnight, until firm.
Pro Tip: Ensure all your ingredients, especially the heavy cream and sweetened condensed milk, are well-chilled before you begin. This helps the cream whip more easily and contributes to a smoother final product.
Method 2: The "Science Experiment" Bag & Salt Method
Remember that cool science experiment from school? This method leverages the same principles to create a super-cold environment that freezes your ice cream base in minutes. It's an interactive and fun way to make ice cream without a machine: 4 easy methods in a hands-on manner.
What You'll Need:
- Your preferred ice cream base (can be the two-ingredient mix, or a simpler custard base)
- 1 quart-size resealable plastic bag
- 1 gallon-size resealable plastic bag
- About 4 cups crushed ice
- 4-6 tablespoons coarse salt (kosher salt or rock salt works best)
- A kitchen towel or gloves (to protect your hands from the cold)
Step-by-Step Instructions:
- Prepare the Ice Cream Mixture: Pour your unchurned ice cream base into the quart-size resealable bag. Squeeze out as much air as possible before sealing it tightly. For extra security, place this bag inside another quart-size bag, sealing it again.
- Build the Freezing Chamber: Place the double-bagged ice cream mixture into the gallon-size resealable bag. Fill the gallon bag with about 4 cups of crushed ice, then sprinkle the coarse salt evenly over the ice. The salt lowers the freezing point of the ice, making it much colder than 32°F (0°C).
- Seal and Shake: Squeeze out all the air from the gallon bag and seal it tightly. Wrap the bag in a kitchen towel (or wear gloves) to protect your hands from the extreme cold.
- Shake It Up: Shake the bag vigorously and massage it constantly for 5 to 8 minutes. Make sure the ice and salt mixture consistently surrounds the smaller bag of ice cream base. The more vigorously you shake, the smoother your ice cream will be, as the agitation helps to break up nascent ice crystals.
- Check and Serve: After 5-8 minutes, open the gallon bag, carefully remove the smaller bag (rinse off any salt from the outside), and check the consistency. It should be firm but still soft enough to enjoy immediately. Spoon into bowls and savor your quick creation!
Science Fact: When salt dissolves in water, it disrupts the formation of ice crystals, lowering the temperature at which water freezes. This creates an environment cold enough to freeze your ice cream mixture quickly without turning it into a solid block of ice.
Method 3: The Manual Stirring and Freezing Approach
This method closely mimics the churning process of a machine through diligent manual labor. It requires a bit more attention but yields fantastic results with any ice cream base recipe.
What You'll Need:
- Your chosen ice cream recipe mixture (custard, simple base, etc.)
- A deep stainless steel baking dish or a shallow metal pan
- A sturdy spatula, whisk, or even a hand mixer
Step-by-Step Instructions:
- Initial Freeze: Pour your unchurned ice cream mixture into the stainless steel baking dish. Place it in the freezer for about 45 minutes to an hour, or until the edges just begin to freeze and crystalize.
- First Stir: Remove the dish from the freezer. Using a sturdy spatula or whisk, stir the mixture vigorously. Scrape down the frozen edges and thoroughly combine them with the softer center. Break up any ice crystals that have formed.
- Repeat: Return the dish to the freezer. Continue to check the mixture and stir it vigorously every 30 minutes for the next 2 to 3 hours. As the mixture gets firmer, stirring will become more challenging, but this consistent agitation is crucial for preventing large ice crystals.
- Optional Mixer Use: If you have a hand mixer, you can use it during the later stages when the mixture is semi-frozen to incorporate more air and ensure a super-smooth texture. A powerful blender can also work for a quick pulse.
- Final Freeze: Once the ice cream reaches your desired consistency, or is uniformly smooth, transfer it to an airtight container and freeze for a final 2-4 hours to firm up completely before serving.
Tip for Success: Using a shallow metal pan can help the ice cream freeze more evenly and quickly, reducing the overall time needed for this method.
Flavor Ideas Galore: Unleash Your Creativity
The beauty of homemade ice cream without a machine is the endless customization. Once you master the base methods, especially the two-ingredient no-churn, you become the ultimate flavor artist!
- Classic Vanilla Bean: Add vanilla extract and a scraped vanilla bean for gourmet flair.
- Rich Chocolate: Fold in sifted cocoa powder and mini chocolate chips. For extra depth, melt some dark chocolate and swirl it in.
- Fruity Fun: Puree fresh berries (strawberries, raspberries, blueberries) and swirl them into the base. Mango, peach, or passion fruit purees are also fantastic.
- Cookie & Candy Mix-ins: Crush Oreos, Biscoff cookies, shortbread, or add chopped candy bars like Snickers or Butterfingers.
- Nutty Indulgence: Swirl in peanut butter, almond butter, or finely chopped toasted nuts (pecans, walnuts, almonds).
- Coffee Lover's Dream: Mix in instant espresso powder dissolved in a tiny bit of hot water, or a shot of cold brew concentrate.
- Boozy Bliss (Adults Only): Add a tablespoon or two of a liqueur like Kahlúa, rum, Baileys, or Grand Marnier. Be mindful that too much alcohol can prevent the ice cream from freezing properly.
- Spiced Delights: A pinch of cinnamon, cardamom, or pumpkin spice can transform your ice cream into a seasonal treat.
Achieving Perfection: Tips for Your Best No-Churn Ice Cream
- Cold is Key: Ensure all your liquid ingredients (heavy cream, condensed milk) are well-chilled before starting. A cold bowl and beaters for whipping cream also help.
- Don't Overmix Whipped Cream: Whip until stiff peaks, but stop before it becomes grainy or separates into butter.
- Gentle Folding: When combining whipped cream with other ingredients, fold gently to maintain as much air as possible.
- Airtight Storage: Always store your homemade ice cream in an airtight container to prevent freezer burn and ice crystal formation. Press plastic wrap directly onto the surface before sealing for an extra layer of protection.
- Patience is a Virtue: Allow ample freezing time. While some methods are quick, a final chill of at least 6 hours (or overnight) will give you the best, firmest scoopable texture.
- Soften Before Serving: For the creamiest scoop, let your ice cream sit on the counter for 5-10 minutes before serving.
Making delicious, ultra-creamy ice cream without a machine is not just a clever kitchen hack; it's a doorway to endless homemade dessert possibilities. These methods prove that you don't need fancy equipment to create something truly special. So, gather your ingredients, choose your favorite method, and get ready to indulge in the rich, smooth, and utterly satisfying experience of homemade ice cream. Your taste buds (and your wallet) will thank you!
